Gear
Notes:
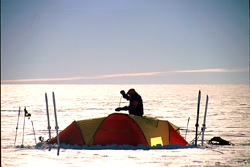
Tent:
It is a good idea to prepare your tent before departure. The tent should be semi-assembled, folded on top of your sled as you travel and you’ll be able to pitch it in minutes, which is very helpful in a snow blizzard. Tape your tent poles in position with electrical or duct tape so they don’t slip out of the tunnels. Tie the snow flukes (4-6 pcs) permanently to the lines. Attach a 4 m long and 4 mm thick line to the windward front of the tent with a loop at the end for fast attachment in a ski or a sled. Attach big handles to the zippers. You’ll need snow flaps for Antarctica, but not for the Arctic. Anchor the tent with skis and poles. A tunnel tent with a large abside work best for Antarctica, but several expeditions have been using dome tents. Img: Helsport Svalbard - perfect 2 person SP and NP
Sled:
Round the edges of the runners with a file (only NP). Tape the pulling lines where they make contact with the sled. Check the cover (not too short as you will top load high). The cover should have strong Velcro. Bungee cords to strap over the entire sled after it’s packed, to prevent stuff from falling out when the sled turns over. Img: North Pole sled from Acapulka
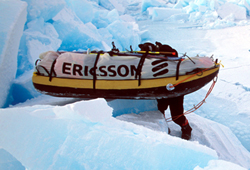
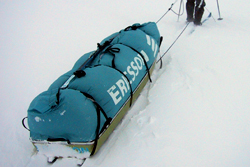
SP: 210 cm long. NP: Two sleds; 210 cm + 150 cm, leave the small one behind. Scratches on the runners could add many kilos to the perceived load. Protect runners carefully. The North Pole sled should float, and you need to water proof the pull line holes. Antarctica sleds should be as light as possible and low. Arctic sleds need to be more torpedo shaped to twist through ice rubble. The Arctic sled needs to be extremely durable and strong. Img: South Pole sled from Acapulka
Harness:
A few people use full body harness. We used waist harness from Acapulka and a lightweight backpack. Pull in a waist harness (or for Antarctica; straight from the back pack).
Pulling system:
Two separate pulling lines with end carabiners hooks up to your harness. The pulling line should be 2,5-4 meters long, light twinned plastic, and 7-8 mm thick for the North Pole. At Antarctica the pulling line could be longer – up to 7 meter – but 3-4 meter works fine. The lines could be crossed to give a more defined pulling force, or separated to pull the sled through rubble.
At Antarctica you could use bungy cord tied in to the rope to make your pull more dynamic. Take a 3-4 mm cord and fold it 4-6 times. Tie of loops with electrical tape in both ends of the fold. When folded the cord should be app. 1 meter. Put one end of the fold in the pulling carabiner. Now tie a knot on the regular pulling rope app 65 cm down the rope from the pulling carabiner. Hook the other end of the bungy cord into this knot. You will now pull from the folded bungy cord, except when the sled gets stuck and the cord will get help from the rope.
Skip the rubber cord for the North Pole. Make instead several stop knots at the pulling line for easy pull over ridges.
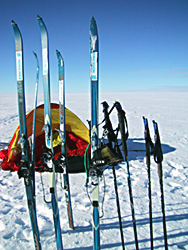
Skis, bindings and poles:
There are variations but the binding listed (3 pin) have proven very successful. We didn’t brake one single binding or ski in three +60 day polar expeditions. Beware of other types of shoes, bindings and skis as they break very easily. Img: Asnes and Madhus skis
Asnes skis from Norway are used by most of the expeditions. Length NP - 180 cm. SP - 180-200 cm.
Attaching skins to the skis: Clean with acetone or the equivalent, sandpaper slightly, glue on with super glue (or skin glue) and screw in place with flathead screws. A hatch should fit the skin to the front part of the ski. Remove (cut off) part of the front and end of skins at Antarctica’s last degree and around mid April at the North Pole.
The ski poles should be sawed to fit your height; they should end below your heart level to prevent low blood circulation in the hands and subsequent frostbite. Attach enlarged handles and reinforce the handles by taping them over.
Mark skis, ski poles and other stuff with bands of differing colors if members of expedition use identical brands and gear.
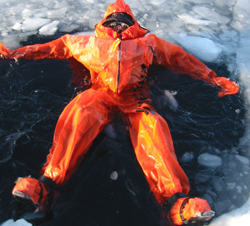
Dry suit (NP):
Helly Hansen Norway custom made. Order in time and try it in water, the suits occasionally leak water. Img: Guess who - floating...
Shoes:
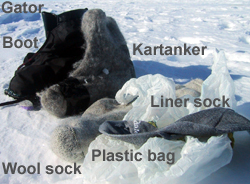
The Mordre Alfa Extreme shoes might look a bit vintage as they are a reproduction of Amundsens shoes, but they do their job. The shoe soles sometimes cracks up on travel. This is best avoided by using cable bindings. Check the soles daily! Should a crack occur, mend immediately with super glue (or sow with a thick needle and parachute thread). The woolen socks “Katanker” that come with those shoes will get worn fast, patch them over the heel with some skin or goretex fabric before the expedition. Bring a spare patched pair. Sturdy grocery store plastic bags will multi function to store your daily food portions and then as vapor barriers between the sock liner and the other socks when on travel. Instead of this arrangement you can also use vapor barriers – bring two pairs.
Foot system:
The arrangement is as follows: Thin Polyprene sock (coolmax), Vapor barrier, Wool sock, Katanker, Shoe, Gator. Fixate the gator to the shoe (all around, just above the sole) with Velcro. The gator need to be custom made. RAB Bivouac shoes for camp.
Clothes system: South Pole
2 thin wool/synthetic inner layers. 1 medium wool/synthetic middle layer “Ullfrotte”. Middle weight Fleece layer for camp. Gore tech Shell pants and jacket. Oversized thick Down jacket and oversized down west. Attach wolverine or wolf skin to shell jacket hood (inside brim).
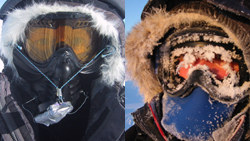
Head: Thin fleece balaclava. Neoprene face mask. Scott (off road bikers) goggles and face mask. Turbo flow lens, color of lens yellow. Sunglasses with UV glaze and side cover. Wind proof fleece hat with ear flaps. Hood with fur, reinforce hood by the ear section. Img: Left - face mask SP. Right - face mask NP.
Hands: Fleece wrist band. Extremities thin finger glove. Wool finger glove with cut off tips. Wool or thick fleece mittens. Gore tech shell.
Clothes system: North Pole
1 thick and one thin layer of Brynje underwear top and bottom. I medium weight fleece middle layer. Marmot Armstrong stretch jacket and pants outer shells. Heavy weight oversized synthetic west and jacket. No need for hood skin.
Head: Thin fleece or polyprene balaclava. Scott goggles, no lens. Attach neoprene loosely to goggles for face cover. (Matti at Northwind customizes. LINK Hat and hood.
Hands: Make fleece wrist bands by cutting off the hand part of some warm, high gloves. Much heat is lost from your wrists and they need extra protection. Extremities finger gloves. Fleece or wool mittens. Cotton or breathable custom made outer mittens. Goretex will ice up.
Sleeping bag:
SP: Heavy weight extra long down (Marmot). NP: Heavy weight extra long synthetic (Ajungelak or North Face). Sleeping system for the North Pole: Vapor barrier attached to inside Sleeping bag. Another Vapor barrier outside sleeping bag. Big fiber outside Fleece cover. Nylon cover. (Sjur Mordre customizes). Remove fleece cover mid April.
Sleeping pads:
SP: Three thick extra long ridge rest and two heavy weight Thermarest (between 2 people). NP: 4 Thick extra long ridge rest and 2 thin ridge rest (between two people). Place cross each other, bottom layer diagonal, top layer horizontal.
Kitchen:
It’s a good idea to have a sturdy, light plastic container for the kitchen gear at the South Pole. Store burners attached to fuel bottles, a plywood base to go under the burners (so they don’t melt through the ice or tent floor), the pots, mugs, brush, oil, spices and other kitchen stuff. In a blizzard it’s very convenient to just lift the entire kitchen box out of the sled. Fixate the stuff in place with the plywood base as a lid, held in place by bungee/shock cord.
The North Pole doesn’t suffer the blizzards of Antarctica and you’ll carry the kitchen stuff in thin bags to save weight. Protect burners by storing them inside the pots, lids secured in place with thin bungee cord.
Pots and utensiles:
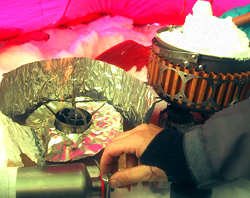
Titanium pots with lids that double for plate. Titanium spork. Lightweight plastic thermos mugs. Dish brush (cut of handle) for scraping of dishes with snow. Several pot handlers. Heat exchangers (modified for larger pot) use only for SP. NP use windshield. Several Thermoses and water bottles. Pee bottle cross marked with black tape (permanent marker pen fades). Img: MSR XGK for SP with windshield.
Burner and fuel:
You might experience problems with the burner if you don’t clean it out regularly. Be sure to shake the burner after each usage and bring spare parts. In severe cold, the burner can be stripped down to the essential part (burner and nozzle) and extra preheated before igniting by warming it over a metal cup holding a small amount of burning fuel. Essential procedure for the North Pole.
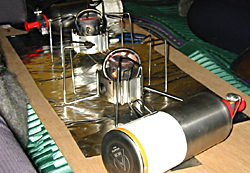
As you gain altitude at the South Pole, it will be important to ventilate well while cooking as the lack of oxygen in the air will affect the fuel’s burning ability. Img: XGK burner stripped and put into Whisperlight holder - NP.
The fuel consumption will vary with the cold. In extreme cold you can count on using up to two liters of fuel a day on a two person expedition, whilst a few hundred of centiliters will be enough for warmer temperatures. Keep that in mind at the beginning of the expedition, as you will travel into cold on Antarctica as opposite to the North Pole.
Bring at least 30-32 liters for Antarctica and 45-50 liters for the Arctic (2 person expedition). It will be enough but only if you are extremely strict with consumption. The weight of one liter of white gas is 700 gr.
Store fuel away from food and carry it in fuel bottles and plastic containers. The metal fuel canisters provided by the operators have cracked open on several expeditions, contaminating the food. To carry the fuel all divided in fuel bottles is too heavy. The optimal is to carry 8 Titanium MSR 0.7 liters bottles filled up and the rest in 5 liter (cold rated!) plastic containers. Check gas stations for good fuel canisters. Bring a funnel to help filling up between container and bottle. Never allow fuel to touch your skin in severe cold as it causes frostbite.